
Shade sails have exploded in popularity across the US, transforming basic patios into architectural statements. However, the difference between a stunning, professional-looking install and a sagging eyesore comes down to one thing: Tension.
A common question we hear is: "Should shade sails be tight?"
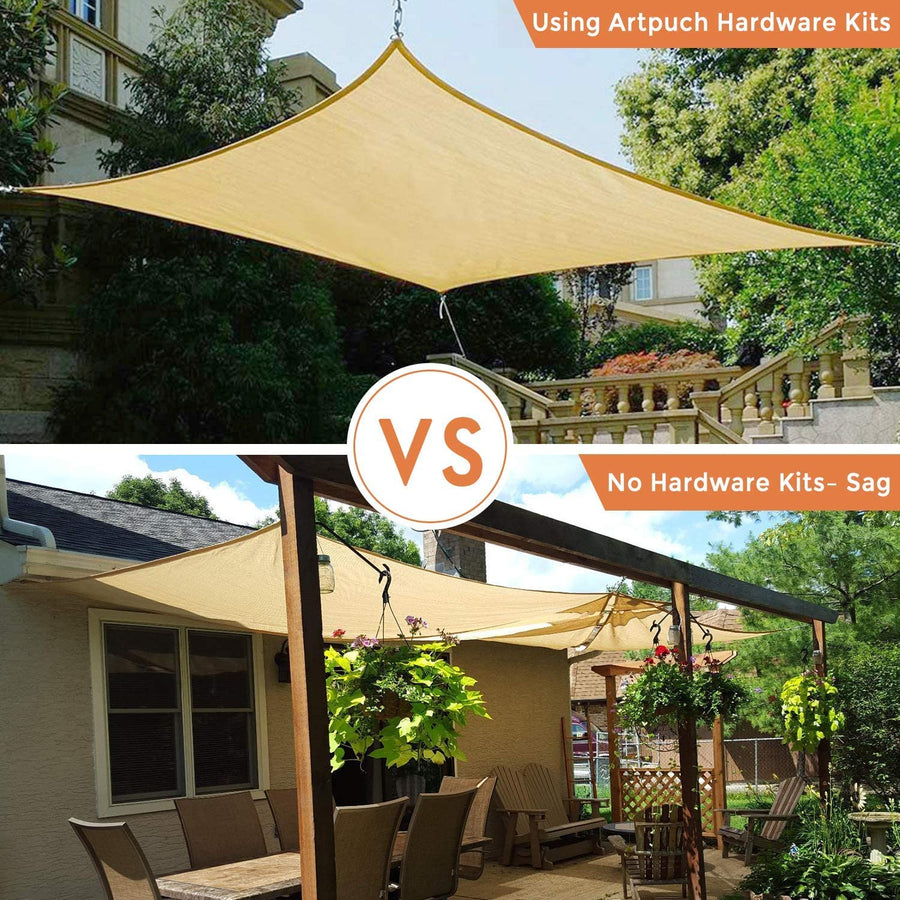
The short answer is: Yes. Your should be "drum tight." If it ripples in the wind, it is too loose. Proper tension isn't just about looks; it's about physics. Here is the truth about shade sail tension, how to achieve it, and the mistakes to avoid.
Why Tension is Non-Negotiable
You might think a loose sail puts less stress on your posts, but the opposite is true. A loose sail is a safety hazard.
1. Eliminate "Wind Whip"
A loose shade sail catches the wind rather than deflecting it. This causes "wind whip"—violent flapping that snaps hardware and tears fabric. A properly tensioned sail allows wind to pass over it smoothly, significantly increasing the lifespan of the product.
2. Prevent Water Pooling
If you don't have enough tension, rainwater will pool in the center of the fabric. This creates a "belly" that stretches the fabric permanently and can eventually cause the sail to collapse under the weight. (Note: Waterproof sails require a steeper slope than breathable sails to shed water effectively).
3. The "Designer" Look
A sagging sail looks cheap. A tight sail features those sharp, clean architectural curves (catenary curves) that give shade sails their modern aesthetic. If you want your backyard to look high-end, you need high tension.

The Role of Material: HDPE vs. Polyester
Tension capabilities depend heavily on the fabric you choose. Don't be misled by myths about fading.
- HDPE (High-Density Polyethylene): This is the industry standard for breathable shade sails. It is knitted, not woven, which means it allows hot air to escape upward. HDPE is highly UV resistant and does not rot or fade easily. Because it has a little stretch, it requires significant tension to pull out wrinkles and stay taut.
- Polyester: often used for waterproof sails. It is lighter and has a tighter weave. While effective for rain, polyester can be more susceptible to UV degradation over time compared to high-quality HDPE unless specifically treated. It typically has less stretch, meaning your measurements must be precise.
How to Actually Tension a Shade Sail
You cannot tighten a sail by hand pulling ropes. You need mechanical advantage. Here is the 3-step secret to a professional install.
1. Use Turnbuckles
Don't rely on ropes or carabiners alone. You need turnbuckles at least on two corners of your . Turnbuckles allow you to crank the tension tighter than human strength allows. They also let you re-tighten the sail easily as the fabric relaxes over time.
2. The "Hypar" Twist (Height Variation)
This is the #1 mistake DIYers make. Do not install all mounting points at the same height. You should mount two diagonal corners high and the other two low. This "twist" shape (Hypar) prevents the fabric from sagging in the middle and helps shed water efficiently.

3. Account for Hardware Gaps
When measuring your space, deduct roughly 10-12 inches from each corner to accommodate your turnbuckles and hardware. If your sail reaches all the way to the post, you have no room to tighten it!
Is It Possible to Over-Tension?
Yes, but under-tensioning is far more common. Over-tensioning can pull posts out of alignment or damage the D-rings. The "Sweet Spot" is simple: Tighten the turnbuckles until the wrinkles in the fabric disappear and the sail feels rigid, like a drum skin, when you tap it.
Pro Tip: New sails will stretch slightly in the first few weeks. Plan to revisit your installation after 14 days to give the turnbuckles a few more turns.